Pages

vendredi 30 mars 2018

WIPocalypse - March 2018

Hi everyone,

here is my monthly progress as March 25 31 WIPocalypse (almost on time !) . I've been talking a lot about Japanese Embroidery, but i still work sometime on my cross stitch. I've done a lot since my last monthly report, had some new starts on the way ( but no finishes ^_^ )

WIPocalypse rules are here on Measi Blog

So here is the question of the month : 

March 25 – What newer designers and product creators (fabric or floss dyeing, etc) out there have you discovered and recommend?
This year, I discover more of Japanese embroidery. I love de Japanese Embroidery Center designs, and also Midori Matsushima's ones. I love the silk thread, you can do so much with it, it's a pleasure to stitch because of its delicacy and beauty. 

Here are my progress !!  

Warning : VERY LONG POST. TOO MUCH PICTURES. (Joke, never enough pictures)


Japanese Embroidery

#1 Bouquet from the Heart of Japan

I won't lie, March was kinda hard for me. I've made a lot of work in February, but had to remove A LOT (like 6 or 7 hours of work, maybe more) because some things were not quite right.

So it all began here. 


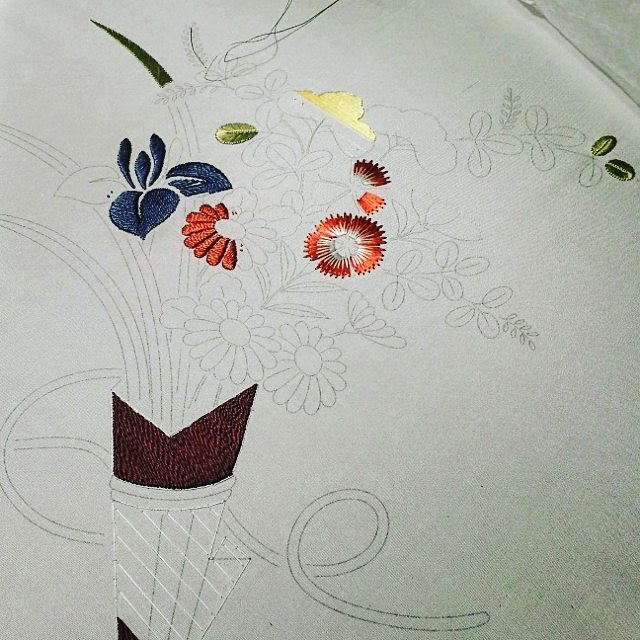
Now it looks like this.  
Well... almost. I was too lazy to take another picture with paperbag done ;)


(It looks so empty without pinks !!! )

#2 Colours of Spring

This piece is a small kit from Midori Matsuchima. I did a little but of work on it, but it was before i has my Japanese Embroidery Class... si it's VERY FAR from perfect. Since i'am working mostly on my bouquet, i don't know when I will comme back on it. Maybe i will remove everything now that i had a complete formation. So here is what i looked like on the last time.


It's a little bit sad. I should really remove everything.


Cross stitch

Most of my time is on Japanese embroidery.... but i still do cross stitch ! Usually when i am too tired to do anything but repetitive movement and counting while watching movie. There is something very relaxing about cross stitching, almost contemplating.

In those 3 years (Ishhh.. ) of not blogging, i did a lot of work. I will try to recall every WIP and new beginnings i made ( And no finishes at all lol). I will try to have NO OTHER BEGINNINGS this year ... easier said than done. 


It all came to this : 


ok so let's go back to my UFO's... WIP's to see what was improved.


#1 Elegance of the Orient

Yesss ! A lot of work done ! 


Tadaa ! Lighting is not that good, maybe i will take another one someday.

#2 Jazz café

... and yess ! Improved ! 


Still a lot to do, but coming good !

#3 Mad Hatter

Well.. no. nothing.


Sorry

#4 Pagoda View
  Yes ! A little bit. Not easy to spot on this pictures. I will have another one someday.


 Bad lighting and bad phone kills art.

#5 Mini Hogg

Yay ! Moredone. But still unfinished. 


New Starts

This is where it hurts. When you should work on your things and you literally procrastinate cross stitch by cross stitching something else !!!

#1 Charlotte


From Mirabilia, my favorite. But I lost the pattern on my last moving :(

#2 Villa Mirabilia

This lady is so gigantic !!! I did almost nothing 


#3 Mini Birthday mouse.

Okay, I lied earlier when saying i finished nothing. I began AND finished this little cutie.


Ready to put in a card !!

#4 Kimono Sunset 


Annnnd thats it. For my defense, two of them were on a Eventually-To-Do-List. And i finished another one. 


So i think that's it... 
I feel so guilty for having all those WIP. Not blogging made me lose track of what i was working on, and how much of them i had !!!


As we say in french : Admitted offence is half forgiven.

Ok, this was long post. It's the punishment for not blogging for so long. Thanks for having made through it !!

Japanese Embroidery Class Phase 1 - Day 3

Day 3 of the class was one of the worst. After praises from the teacher about my beginner-skills-okay-for-the-nuido (I never made embroidery before !! ), I hit a wall that day. A massive one, and my inexperience gave me a lot of troubles.

First of all : Japanese knots.
I had troubles earlier in my life with french knots on cross stitch. Well, Japanese knots are also not the friendly type.

So while other stitcher were doing somme beautiful flowers with the french knots, all I did was...

Those. Horribles. Tentatives. Of. Straight. From. Hell. Things. 


On the top left, there three almost correct knots. The rest were... yuck. «Practice», yeah. Not a single knot was stitched on the piece that day ( nor 6 months later). My problem is about not pulling the good loop so it creates this kind of tail on the top f the knot. 
For info: I got a crash course of Japanese knot last month, they look better know but still haven't put any on the fabric.


Second struggle of the day : Bush clover. There are 34 of those little devilish things in the piece. We suppose the mad/genius creator of this piece made sure we would know how to stitch them properly at the end of the phase 1. Slow clap for him, they are very hard to do. In fact, they look like being easy. You start on one side, move and turn and shorten the stitches next to the top then turn and do longer and.... 


The teacher said it was not that bad.... but she made me redo the right part two times.
I was almost crying. 
( There is a small difference between the two pictures, I don't know if you will notice it)


On the afternoon, it was a litte bit more relax. We made a special thread, supertwisted thread that we had to put in water and made to dry before stitching. It is used for the stem of flowers. It looks super shiny and i love it texture. We couch it with little regular twisted thread of the same colour (green).

The little seeds ont the side if the green stems is where i should have put my (not on point) knots. 


Finally, we had to couche the outline of the paperbag, because on day 4 we would be working on it. 


So this is what the progress of that horrible day looked like : One leaf, 3 cm of stems and half outlining. And 30 ugly knots on the side.

Doing this blog post 6 months later, i remember the mixed feelings of that day. I was very naive about the Japanese embroidery.. like i knew it would be difficult be living those difficulties for real is not the same. After almost 3 years of waiting for this class, i never thought i would be that hard. Seeing the other stitchers doing there knots almost perfectly (because embroidering for years), I felt a little bit left behind. Moreover not able to distinguish angles and where the needle should land to have te perfect stitch, have to redo 2 times a single side of a leaf... Aouch. 

But the most important is... i'm not a quitter. It was not the first fail i had in my life, and certainly not the last. When life knocks you down, the only thing you can do is stand up. So I stood up, had a great night of sleep, ready for my fourth and last day.


mardi 20 mars 2018

Japanese Embroidery Class Phase 1 - Day 2

The second day of my class was about flat silk. We practiced twisted silk the day before.

This one is a little bit harder. if at first you don't need to do anything to your thread, just take it and put a knot at the end, you have to be a little bit more precocious with it.

Flat silk thread is so hard to work with, one false movement and it snags. Also, you have to use the tekobari (big long stroking needle) to stroke the silk to make sure it lays perfectly flat. Tekobari also enhance the silk to make it shiny. Then, you can't remove your thread too many time. Silk does not support to be removed and becomes ugly after some times. 

It's kinda scary how you have to be careful !!! 

We worked on 3 things for the second day

  • Blue pistil in the middle of iris is made of flat silk. You have to put one layer of perpendicular padding of silk thread under, and follow the movement. So... I tried to. 


  • Second was Yellow Valerian. This one is worked on weft flat silk. It means we have to follow the line if the fabric and put all the stitches parallel. White silk is used as guidelines.


  • Last thing of the day was the orange chrysanthemum. This one has special movement. Each petal has to be inclined in some sort of position from the very center of the flower. At 30˚ exactly, but didn't know this at the moment... This is why they look like very different, one is note at good angle. 
  • They are made from twisted silk, and self padded, like the iris petals.


A question may be asked : why do i began with some petals particularly? Because there is a rule in Japanese Embroidery that the front item have to be stitched before the background. In those 3 pictures, i stitched those items because they were ont the foreground. 

In the chrysanthemum, you have to begin with the bigger petal in front of the other, and then do the others. The one on the left is my first one. The last will be the two little in the back. 

So this what it looked like at the end of day 2


At the moment I was so glad with my work. Looking at it now, 6 months later i see all my mistakes because i've learned so much with practice. I am still very satisfied with how much i improved to this day.

Japanese Embroidery Class Phase 1 - Day 1


Day 1. 9am

I'am so excited. I have been waiting for this day for so long.  I will finally learn all the secrets of Japanese embroidery. The teachers gave us an inspirational speech for our first, about seeking perfection but not be overwhelm by it. She said the journey was more important than the goal, and we should not seek perfection at any price at the beginning, it will come with time and practice.

This my work place, ready to begin


Our first lesson is learning to twist the silk. With 4 brands of flat silk, we have to make twisted threads. Easier said than done. The teacher told me i could twist the silk a little bit more tight. 


For all the morning, we practiced twisting thread. 

In the afternoon, we began to work on the blue iris. It is worked on twisted thread, and we follow the movement of the flower.
First, we have to make padding with the blue thread on perpendicular, then stitch on top of it. 


Teacher was really impressed since i've never did any embroidery other than cross stitch when you only have to put X's in pre-made holes. Following the movement of the flower was quite hard but i was satisfied with my progress for this day